
Multymeter.com-Gadget: A very relevant topic for those of you PS5 users who often experience full storage issues. Have a large collection of PS5 games but the internal memory is always full? You are not alone. The ever-increasing size of modern AAA games makes the console’s built-in capacity often feel insufficient.

The good news is, Sony has an official solution:
1. Upgrading the PS5’s internal SSD.
This article will guide you step by step how to install an additional M.2 SSD so you can store more games without having to constantly uninstall and install. Why Upgrade the PS5 Internal SSD? Unlike external hard drives that can only be used to store PS4 games or run PS5 games through the transfer process, the internal M.2 SSD installed directly in the console’s expansion slot has the same read speed as the PS5’s built-in SSD. This means you can immediately play PS5 games from the additional SSD with the same fast performance.
2. Compatible M.2 SSD Specifications with PS5.
Before purchasing an SSD, make sure your device meets the minimum requirements set by Sony:
• Interface: PCIe Gen4 x4 M.2 NVMe SSD. • Capacity: 250 GB to 8 TB.
• Read Speed: Recommended 5,500 MB/s or faster.
• Heatsink: A heatsink* (either supplied or purchased separately) is required to prevent overheating.
Steps to Install an M.2 SSD in a PS5: The installation process is quite easy and will not void your warranty, as long as you do it carefully.
1. Preparation Make sure your PS5 is completely powered off (Powered Off), not in Rest Mode. Unplug all cables and place the console on a flat surface.
2. Opening the PS5 Case Remove the side cover of the PS5 console (the side opposite the PlayStation logo). Press the edge of the cover and gently pull it up until it comes off.
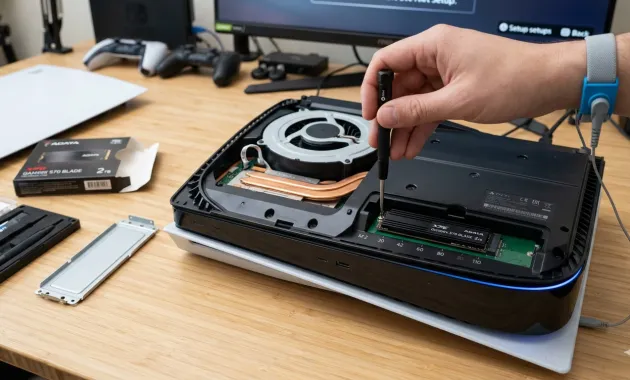
3. Opening the Expansion Slot Cover You will see a long metal plate covering the SSD slot. Use a Phillips screwdriver to unscrew the cover.
4. Installing the SSD
– Remove the screws and spacers inside the slot.
– Adjust the position of the spacers to the size of your M.2 SSD (usually type 2280).
– Insert the SSD into the slot at an angle, then press down and lock it using the screws you removed earlier.
5. Re-Close Re-attach the metal plate cover, then re-attach the console’s outer casing. Configuration After Installation After turning the PS5 back on, the system will automatically detect your new SSD. Follow the on-screen instructions to format it. Once completed, your SSD is ready to use! Additional Tips: Set Automatic Installation Location To have new games automatically installed on the additional SSD, go to: Settings > Storage > Installation Location > Games and Apps > Set to M.2 SSD Storage. Conclusion: Upgrading your internal SSD is the best investment for a smoother and more convenient gaming experience. By following the guide above, you no longer have to worry about choosing which games to delete. Ready to increase your PS5’s storage capacity? Make sure to buy a quality SSD from a trusted marketplace for maximum performance.***